Why This Matters
Double Flow systems provide enhanced drainage capacity for high-volume water management while integrating surface collection with subsurface filtration.
Confirm Utilities
Safety verification is essential before any excavation work begins.
- Ensure 811 has been called and all utility markings have been identified before digging
Excavate the Trench
Create a properly sized trench to accommodate the dual pipe system and catch basins.
- Dig a trench with a minimum of 1% slope, with a flat and compacted trench floor
- Widen the trench in areas where catch basins will be installed by 4–6" on each side to allow proper fit and spacing
Lay Filter Fabric
Filter fabric provides the foundation for the drainage system.
- Lay filter fabric across the trench, securing it with landscape pins
- Keep the base of the trench smooth during this process
Install First Perforated Pipe
The first pipe establishes the primary drainage line.
- Place the first perforated pipe along one side of the trench
- Make sure connections are taped
- Lay tracer wire at this time
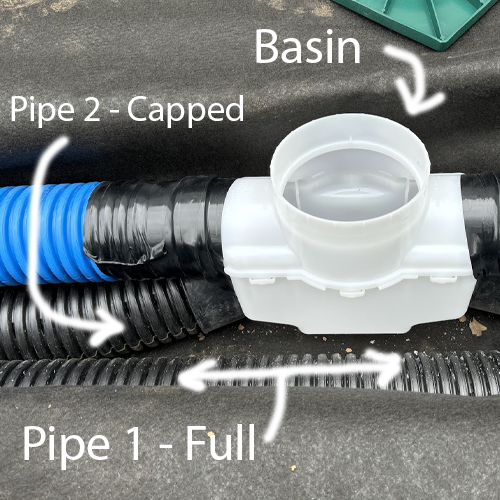
Install Second Perforated Pipe
The second pipe creates space for catch basin integration.
- Lay the second perforated pipe parallel to the first, but cut the pipe and leave 2-foot-long gaps where the catch basins will be installed
- Check with the foreman for the catch basin placements
- Cap the ends of this second perforated pipe during install to prevent gravel from entering the line
- You do not need to tape these cap connections
- These two pipes should fully cover the trench bottom
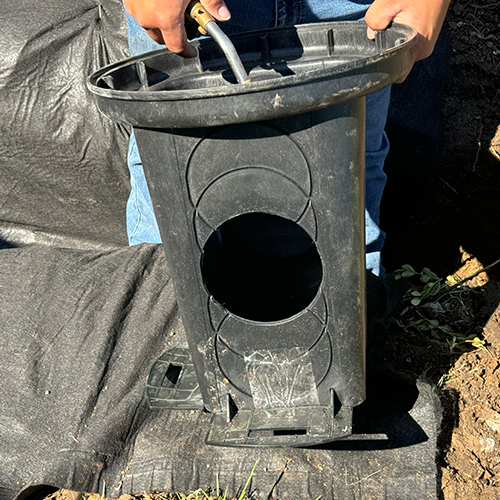
Install Catch Basins
Position catch basins precisely for optimal water collection.
- Set each catch basin into the marked gap between the perforated pipes
- The top of the basin should sit 1–1.5" below natural soil grade
- If the basin sits too low, backfill with gravel to raise it
- Follow the standard catch basin procedure, like drilling holes in the bottom, installing locking rings, and using solid blue pipe
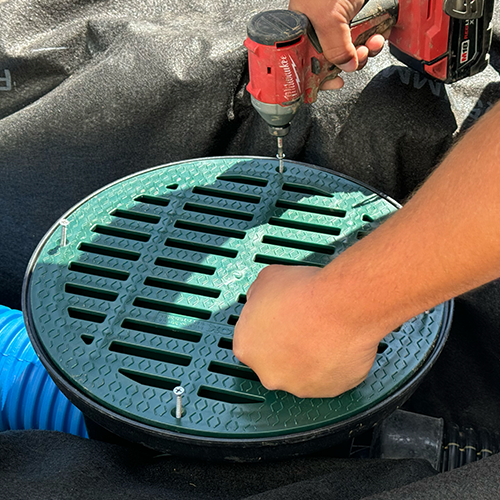
Secure Basin Lids
Proper lid installation ensures system integrity and ease of maintenance.
- Place the grate lids on each basin and screw them in using the hardware that came with the locking rings
- Do not overtighten
- If gravel is being installed around the lid, cover it temporarily with 4" pipe tape to keep the basin clean during backfill
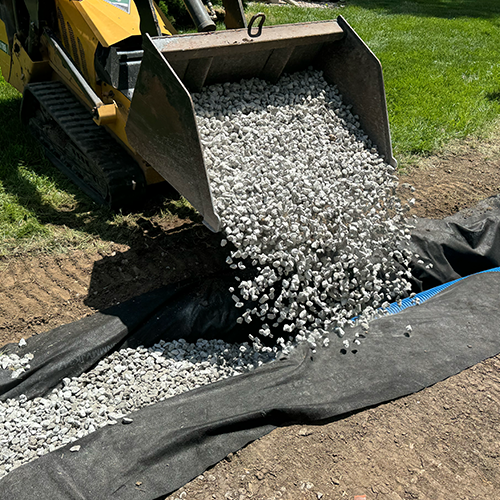
Add Gravel
Strategic gravel placement maintains optimal drainage performance.
- Fill the trench with gravel until it's about 4–6" from the surface
- Hold the solid blue catch basin pipes to one side of the trench while pouring gravel, so it lays on top of one of the perforated pipes
- If the blue pipe falls between the perforated pipes, a low spot may form and reduce performance
Wrap the Fabric
Complete fabric wrapping protects the system from soil contamination.
- Fold the excess filter fabric over the gravel
- Trim overlaps exceeding 2"
- Cut the fabric around the basin tops and secure with landscape pins

Backfill
Final backfilling completes the installation while protecting the system.
- Add the final 4–6" of soil above the wrapped gravel
- Compact the dirt using methods outlined in the backfill procedures